> ## Documentation Index
> Fetch the complete documentation index at: https://docs.conversekit.ai/llms.txt
> Use this file to discover all available pages before exploring further.
# Flow Tools
> Automate Tools using Flows
Flow-based tools allow your **AI Voice Assistant** to execute powerful logic inside Salesforce — without writing code, you just build an **Autolaunched Flow**, and then connect it as a "Tool" in your ConverseKit app.
## 🛠️ Example Use Case: Create Case Tool
Let’s say your assistant is talking to a customer who wants to report a complaint. You want the assistant to:
* Capture the \*\**customer’s name*, *contact number* \*\*and ***complaint***
* Check if a contact already exists in CRM using the customer’s phone number.
* If found, create a **Case** and relate it to that contact.
* If not found, create a new **Contact**, then create the **Case record** in Salesforce with that new contact.
* Return the **Case Number** and **Case Subject** as output.
This is the backend automation logic behind a tool named `Create_Case`.
This is a great use case for a **Flow-based Tool**. We’ll use a Salesforce **Autolaunched Flow** to handle the backend logic while your assistant keeps the conversation going.
***
### 🧱 Required Flow Inputs (Match Tool Parameters)
These inputs come from the assistant, so make sure the variable names match exactly in your flow:
| Variable Name | Type | Description | Input |
| :--------------- | :----- | :------------------------------ | :---- |
| `name` | String | Customer's full name | ✅ |
| `contact_number` | Number | Mobile number with country code | ✅ |
| `complaint` | String | Complaint or issue description | ✅ |
> 🔁 Make sure these match the Flow input variable names exactly.\
> 🧱 Use `snake_case` for consistency and better integration.
### 🎁 Flow Outputs
Your flow is returning two variables back to ConverseKit:
| Variable Name | Type | Description | Output |
| :--------------------- | :----- | :--------------------------- | :----- |
| `created_caseid` | String | ID of the created Case | ✅ |
| `created_case_subject` | String | Subject line of the new Case | ✅ |
These are marked as **Output variables** in the flow, so the assistant can access and say them after execution.
## 🧭 Steps to Build the Flow
1. Go to **Setup → Flows**
2. Click **New Flow**
3. Select **Auto-Launched Flow (No Trigger)**
4. Click **Create**
1. Click **New Resource → Variable**
* Name: `name`
* Data Type: Text
* Check **Available for Input**
Repeat for:
* `contact_number` (Number, input)
* `complaint` (Text, input)
1. Drag an **Element → Get Records**
* Label: Fetch Contact
* Object: `Contact`
* Filter: `MobilePhone Equals {!contact_number}`
* Select **Only the first record**
* Store all fields
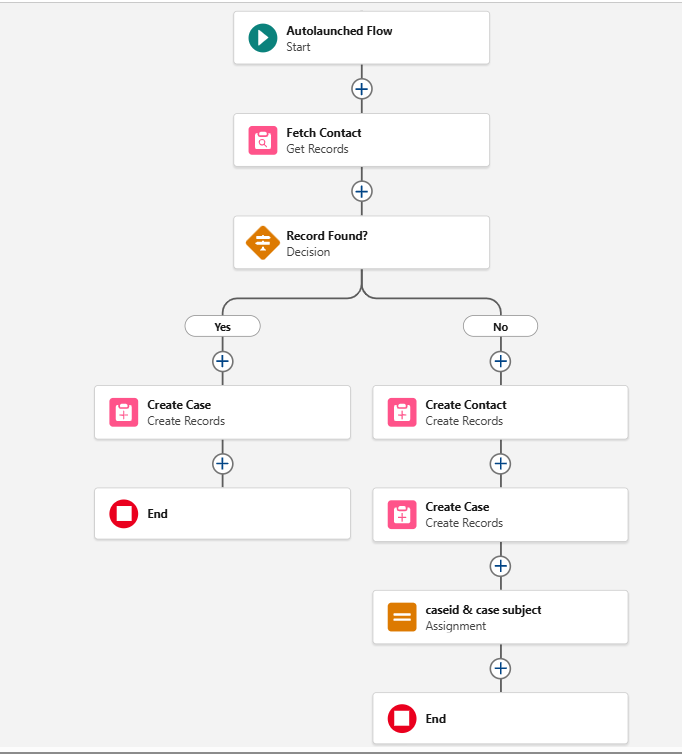
2. Connect this to a **Decision** element
* Label: `Record Found?`
* Outcome 1: Yes → If `Fetch_Contact.Id Is Null False`
* Default: No (contact not found)
***If Contact Found → Create Case:***
1. Use **Create Records**
* Object: `Case`
* Fields:
* `ContactId = {!Fetch_Contact.Id}`
* `Subject = {!complaint}`
* `priority = Medium`
***If Contact Not Found → Create Contact → Create Case:***
1. Create `Contact` using:
* `LastName = {!name}`
* `MobilePhone = {!contact_number}`
2. Create `Case ` using `Contact.Id` from above new contact
Fields:
* `ContactId =` Contact Id from above new conact
* `Subject = {!complaint}`
* `priority = Medium`
1. Click **New Resource → Variable**
* Name: `created_case_id`
* Data Type: Text
* Check **Available for Output**
Repeat for:
* `created_case_subject` – Text – **Available for Output**
1. Use an **Assignment** element:
* Assign `created_case_id = Case.Id`
* Assign `created_case_subject = {!complaint}`
1. Name the Flow: `Create Voice Case`
2. Set **API Name**: `create_voice_case`
3. Click **Activate**
Once All done, you will find a flow like below.
 Now that your backend logic is ready, it’s time to register this flow as a **Tool**.
Let’s walk through how to create a Tool
Now that your backend logic is ready, it’s time to register this flow as a **Tool**.
Let’s walk through how to create a Tool